

Here's what to expect in this episode on Transforming your geometry unit
Geometry is one of those topics that people either love or hate. I’ll admit, as a student, geometry wasn’t my favorite. I could work with numbers all day long. But lines, angles, and theorems? It wasn’t my thing.
However, as a teacher, I enjoyed teaching my geometry unit. It was a nice break from all the fractions and computation we were so used to. But, I was fully aware that my students might have the same dislike for geometry that I had when I was young. This motivated me to make my geometry unit as interesting and as engaging as possible.
In this week’s episode, I share my favorite ideas for the first three lessons in my geometry unit, which cover lines and angles, classifying line relationships, and classifying triangles.
These ideas include warm-up activities that will hook your students from the start, simple ways to relate geometry to Olympic sporting events, kinesthetic games to play, and my favorite small group activities.
I also share an idea for how to handle those challenging questions that come at the end of your lesson (when student engagement is low) in the Teaching Tip of the Week.
Resources Mentioned:
Olympic Skiing and Types of Lines PowerPoint
Winter Olympic Athlete and Angles
Classify Triangles Sort and Solve
Connect with me:
Instagram
Join my Newsletter
Join the 4th Grade Math Facebook Group
Follow my TPT Store
More About Elementary Math Chat
Elementary Math Chat is a podcast for upper elementary math teachers looking for tips and resources beyond the book. You’ll hear recommendations for structuring your math block, differentiating math centers, planning tips, and more. From the first day of school until the last, this podcast will support you with teacher-tested and student-approve ideas that work!
Annamarie Krejci (kret-see) is a former 4th and 5th grade math teacher of 20 years and the face behind Krejci Creations. By sharing what she’s learned as a veteran teacher, she hopes to inspire and encourage teachers every step of the way.
Read the Episode 35 Transcript Here
Hello everyone, and welcome to another Episode of Elementary Math Chat! Before we get to today’s episode, I have a small favor to ask of you. April is my birthday month. My birthday is on the 24th. And since we’re also in the year 2024, I thought it would be fun to try and get 24 reviews on Apple podcasts. It takes so much work to host a podcast and put out a new episode every single week. So, hearing how it has helped you would be the greatest reward and the best birthday present.
It’s also a great way to help other teachers find the podcast, and it seriously only takes a few minutes to leave a review. I know for me, sometimes what holds me back is I’m not exactly sure what I should put in the review. So, if you need some ideas, I would love to hear what your favorite episode was, or a specific teaching tip or activity that you tried with your students that really worked, or maybe even a classroom management strategy that you found helpful.
I’ll even give you permission right now to pause the episode to go and write your review. But make sure you come back, because today I am sharing my favorite teaching tips and ideas for your geometry unit.
Geometry is one of those topics that people either love or hate. I’ll admit, I hated geometry as a student. I’m such a numbers person. So, when you take that away, and you’re learning about lines and shapes and theorems, it just was not my favorite.
I realized as a teacher that I’m probably going to have students who feel the same way. Some of them will love it. But for the others who may not, I really tried to make this unit as engaging and interesting as possible, and that’s what I’ll be sharing with you over the next two weeks.
This week, I’ll take you through the first half of my geometry unit, so we’ll be talking about classifying lines and angles, as well as classifying triangles.
Next week we’ll go through the second half, and those topics will include classifying quadrilaterals, line symmetry, and patterns. So, I hope you’re ready for some geometry tips, because I have a lot of them.
Let’s start with the very first lesson in my geometry unit. This was on lines, line segments, rays, the very basics of geometry. Since we were beginning a brand new unit that was totally different from anything we had studied, I decided to give them a little history lesson about geometry.
So, I posed a few questions for them to think about. Questions like, what does the word geometry mean? And who invented geometry? And how was it used back in the ancient civilizations? These were very basic questions, but I could tell right away that I had piqued their interest.
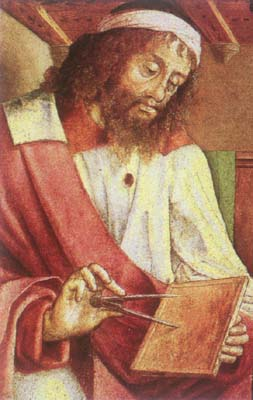
So, we talked about the meaning of geometry, which means “to measure Earth”, and then I showed them a picture of the person known as the Father of Geometry. His name is Euclid of Alexandria. Don’t worry, I didn’t know that either. I had to look it up.
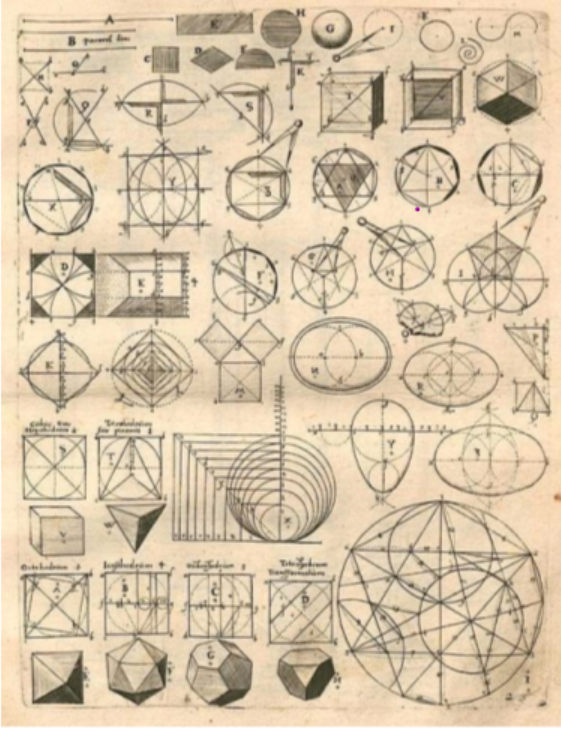
The part they found the most intriguing was when I showed them some of the most ancient records of geometry. And when I say ancient, I mean ancient. These were done over two thousand years ago, so they were pretty fascinated with these drawings.
I asked my students to look at them and see if they could pick out any objects that they recognized. They recognized a few things. They could pick out the circles, the lines, and the squares. What’s funny is they often say they can see arrows, they don’t necessarily know the term ray just yet.
As we looked at these really fascinating geometric designs, I reminded them that all of these figures began by putting together the basic elements of geometry. That’s when I introduced them to the terms point, line, line segment, array, and angle, and I showed them pictures of these basic elements.
We then went back to the geometric images, and we looked for these basic elements, and they were much more obvious this time around. This was such a great way to help them understand how the basic elements of geometry that they were about to learn, make up the vast world of geometric shapes.
I even tell them when they get to high school or college that they’ll spend an entire year learning about geometry just because there is so much to learn. If you’re interested in looking at those pictures, they will be linked in the show notes. I think your students will enjoy looking at them as well.
So, that’s how I started the lesson, but here’s how I ended it. We ended this lesson by playing a game of Simon Says. We didn’t play it until the very end, but they knew we were going to play it, so they had to pay attention or else they wouldn’t do well in the game.
So, as they learned about these figures, I would teach them the arm motions that went along. For example, if they were modeling a line segment, they would put both arms out with their fists closed. If it was a ray we were modeling, then we opened one of our fists. Then at the end of the lesson, I had them stand up and spread out so they didn’t knock anyone out, and we played a little game of Simon Says.
I did help them in the beginning. So, I stood in the front and did the motions with them. But by the end, they were on their own, especially when I had a hard time getting a winner. Sometimes I feel like this game can go on and on. Here’s a trick though, if you ever get to a point where no matter what you do, or what you say, you still have a handful of students left in the game. I mean, you could just say they all win. Or you could do something a little tricky.
Tell them to go ahead and shake their arms out. They’d be holding their arms in a line or array or something like that, and I would say, all right, you guys just shake her arms out, maybe come up to the front a little bit so I can see you better, and they totally let their guard down and forget that I never said Simon Says, so they shouldn’t move when I say that. That trick only works once or twice and then they tend to catch on.
Or what I would do is I would make the wrong motion to try and throw them off if I couldn’t get a winner. I know that sounds mean, but it was all in good fun, I promise.
The next lesson in my geometry unit was on line relationships. So classifying lines as parallel, intersecting, or perpendicular. I began this lesson with a few conditional statements to get them thinking about how items can be related in some instances, but not in others. They’ll eventually connect this idea to perpendicular and intersecting lines as well as later in your quadrilateral unit. So, it is an important concept, but it can be tricky to understand.
So, I started by using items that they were already familiar with. Here was my first example. All lollipops are candies, but not all candies are lollipops. Well, what kind of candy is not a lollipop? You’ve got warheads, nerds candy, and gummy worms. So, once we came up with three examples to prove that it was true, we moved on to the second example.
My second example was all labs are dogs. But not all dogs are labs. A lot of them had dogs at home. So right away, I had hands flying in the air. And they’re like, yes, I’ve got a Yorkie and a Golden Retriever and a bulldog. So, this was another easy example for them to understand.
Now that they understood how these conditional statements worked, I challenged them to come up with their own statement that related to line relationships. So, as we went through and talked about the types of lines parallel, perpendicular, and intersecting, I wanted them to think about how they were related in some instances, but not in others.
When we got to the end of the lesson, I could see some of them were like, wait a minute, I know what she was talking about. So, I gave them a chance to brainstorm with their table group and try and come up with a conditional statement about lines. Some were successful, but this was a challenge for others. And that’s okay, it was just kind of fun to get them thinking. Of course, the goal was for them to say that all perpendicular lines are intersecting, but not all intersecting lines are perpendicular.
We ended this lesson by going through a PowerPoint, and this is really neat because it has these action shots of Winter Olympic skiers. Some are in the air, some are skiing downhill, and so we looked at the position of their skis. If they were skiing, they were most likely parallel. But if they were in the air doing a turn or a trick, they could be intersecting, they could be perpendicular, they could be intersecting and perpendicular. So, we tried to take that statement and apply it to each image.
This is a free PowerPoint on TPT, and I will have that linked in the show notes. It was a really fun way to wrap up this lesson.
Let’s move on to the third lesson in my geometry unit, and this one was on classifying triangles by their angles. My favorite part about this lesson was the warm-up activity that I did. I actually found another set of images on TPT that showed winter athletes in action. But these images included a lot of other sports besides skiing.
For example, one of them showed a figure skater holding their leg in the air. That was an obtuse angle. Another one showed the lunge of a curling athlete. That was also an obtuse angle. And then another one showed the angle of a hockey player’s stick. That was an acute angle. There are seven images in all, so it’s a pretty quick activity, but it really gets them engaged and thinking about the types of angles. I will also have that one linked in the show notes for you, and again, it’s free on TPT.
My other recommendation for this lesson is what I did for small groups. This is called a sort and solve activity, and their job is to sort the triangles into three categories acute, obtuse, and right. I love the hands-on aspect of this activity and the fact that they can turn the triangles to get a better view of the angles. That is especially helpful for right triangles because I find they struggle when the right angle is at the top of the triangle. So, when they’re able to turn the pieces, they’re more likely to see that right angle.
I did have my students complete this sort with a partner. They enjoyed being able to talk about the triangles with another person, and it helped the activity go a little bit faster. So, I would recommend doing this with partners. I’ll have this one linked in the show notes as well, and right now, it’s only $2.50 on TPT. So, that’s a really good deal. And I’m telling you, I liked these sorts so much that I bought a whole bunch of them. They are from the TPT seller Rulers and Pan Balances, so definitely check those out.
All right, well, that is the halfway point of my geometry unit. We’re gonna pick up next week and cover the second half of my geometry unit. The topics I’ll be discussing next week are classifying quadrilaterals, line symmetry, and patterns. So, stay tuned for part two next week, and that’s going to take us to today’s teaching tip of the week.
I think it’s fair to say that by the end of our lessons, our students’ attention is pretty much gone. And so, my tip for you today is to take those questions that come at the end of the lesson that are super important, it may be a multi-step word problem. It might be a certain type of question that you know is on the test. And instead of saving it for the end of your lesson, plan it for your small group activity instead. So, this would be more of a teacher-led small group, rather than just having students practice with you helping.
For example, I did this when I taught the lesson on converting metric units of measure. There was this one question at the end, and I rarely had time to get to it. It was a question that had a chart with three categories labeled 5 meters, 55 centimeters, and 500 millimeters. They were given nine different measures to sort into the category with an equivalent value. So, I wrote these nine measures on sticky notes, and I drew the table on my whiteboard that was behind my teacher table.
We went around the table, and one at a time, they read the measurement that was written on their sticky note. And then as a group, we decided where to place it. For example, one was 5000 meters, so that would go under the 5 meters column. Another one was 500 millimeters, and that would go under the 55 centimeters column.
It was much more effective to do this type of question in a small group, rather than at the end of my whole group lesson. So, consider those challenging questions that you either rarely have time for, or come at the end of your lesson when your students have completely checked out, and plan those to be your small group activity instead.
All right, friends, that is all for today. Have a great week and I will see you next Tuesday for part two.
Listen to Elementary Math Chat through your preferred podcast listening app by clicking below!

Innovative Ways to Keep Kids Learning Math Over the Summer (EP 39)

Creative Teaching Tips and Ideas for Perimeter and Area Part 2 (EP 38)
